I've owned my Nord Piano 2 a couple years, recently noticed 5 keys on the lower register no longer producing any sounds. It happened recently after a moving company moved it, although I did have it shipped in the original packaging. Mechanically the keys felt fine, so I assumed it was just dirt / debris in the key action.
After taking everything apart and cleaning, I was right! I THINK it was really just excess grease that had made its way to some of the rubber contacts in the key action. After cleaning the contacts, removing / putting back the circuit board, everything seems to work perfectly, yay! It took me about 3-4 hours across 2 days, and I went really slow. I'm pretty comfortable with taking apart electronics, so if you aren't, this whole procedure may freak you out. But for me, it was worth it to save the money and time versus sending it to a repair shop.
This forum helped a lot, and I used these threads as reference...
http://www.norduserforum.com/nord-stage ... tml#p22246
http://www.norduserforum.com/nord-stage ... t7446.html
But since there isn't any thread about opening up the Nord Piano 2 specifically, I documented everything I did, and with pictures!
(here we go)
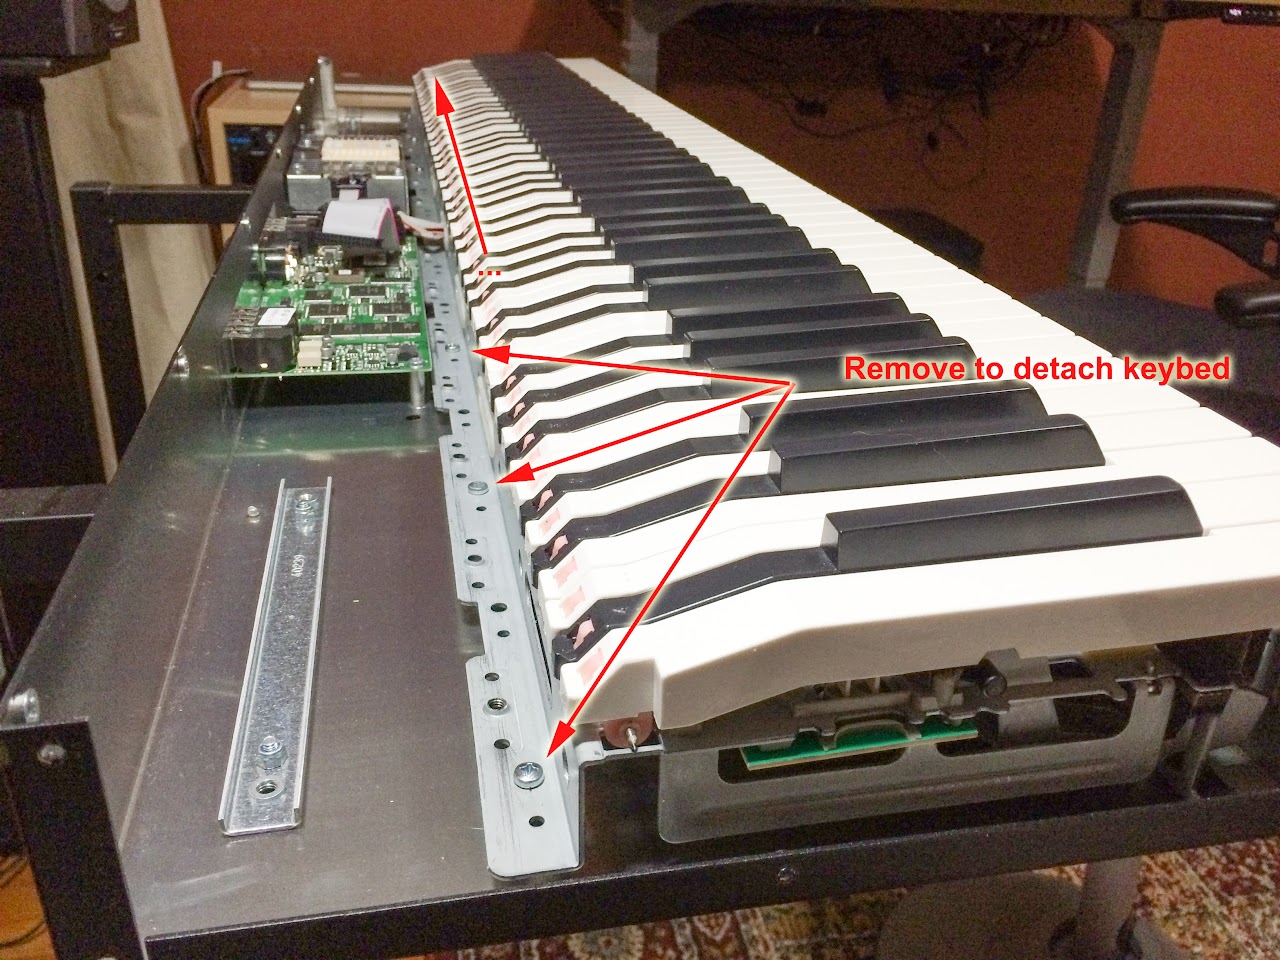
1) From the bottom of the keyboard, unscrew the 4 screws that connect to the keybed, and the 2 screws that attach to the top panel. I posed the keyboard upright for the pic, but you can do this while the keyboard is on a keyboard stand most likely.

2) From the back, remove the 7 screws securing the top panel to the bottom casing

3) From the wooden side panels, remove 4 of the 5 screws, and just loosen the far bottom one. This will act as a hinge when we open the top panel. Once the top panel data connector is disconnected, then we can remove this screw.

4) Facing the front of the piano, grab the wooden sides, and lift up, hinging on that last screw you didn’t remove completely.

5) Next we will start disconnect cables, but I recommend you find some good plastic prying tools. These are cheap, and won’t damage the circuit board if you accidentally slip or press too hard.

6) Disconnect the top panel data connector. You should be able to do this with your fingers by grabbing the side tabs and moving them away from each other. Once disconnected, you can return to those wooden panel last screws, disconnect them, and lift the top panel up and away.
You will also need to disconnect the 2 orange connectors + 1 white connector on the bottom circuit board. We need these disconnected to remove the keybed. Use your plastic pry tools and go slowly. Don’t yank anything or apply any significant amount of force here.

7) The top panel removed. Now is a good time to blow some canned air or wipe down the keys.

8) The bottom circuit board connectors disconnected. Make note of which connectors go where.

9) The connectors set to the side

10) Let’s get to removing the keybed now. Remove all the screws securing the top part of the keybed chassis to the outer casing.
11) Once the keybed screws are removed, we are ready to lift the keybed straight up and out of the casing. Two people help here, but I was able to do it by myself, just go slowly and be careful.
I found the best place to grab the keybed was on the sides, on the metal frame. It’s probably not a good idea to grab it by the green circuit board, it’s pretty heavy.

12) The case with the keybed removed..

13) Lift up and place on a table with some kind of padding so you don’t scratch your keys. In this picture, I’ve also flipped the keybed so the keys are facing down.

14) Remove the 3 data cables, then remove all metal struts. There are 9 struts, each attached with 3 screws.

15) Remove all screws that attach the circuit board to the frame. Keep a note of which screws go into which holes (take pics like I did).

16) The circuit board is now free to be removed. There are a lot of pieces and screws loose here. Lift straight up to remove the circuit board. It's actually made up of two pieces connected by a ribbon cable. I didn't bother disconnecting the ribbon, I just carefully lifted both pieces at the same time.

17) The circuit board removed and flipped over to reveal the rubber contacts for each key. For those that don't know, each key makes contact with the circuit board twice on a single press, each time completing a circuit and registering a signal. The difference in time between these signals is how velocity is calculated.

18) Now here's where everyone's experience may vary. What is causing your dead keys? In one post I read, it was underneath the rubber contacts that was dirty and preventing an electrical connection. I checked under a key I knew was dead, and the contacts looked clean.

19) I did notice that the top of some of my rubber covers and a lot of excess grease on them. I figured this could affect the mechanical point of contact at least, so I cleaned them by wiping off the excess with my plastic pry tools.

20) I also cleaned the part of the each key that makes contact with the rubber contact, there was excess grease here too

21) Here's an optional step. I'm a total nerd and like playing with multimeters and know how to check continuity with circuits. So if you are like this too, now is the time to check your dead keys before reversing all these steps and putting everything back together.
22) Put everything back together using these instructions in reverse. Follow any pictures here and any pictures you took to help you out.
If you've taken your time and fixed any issues properly, your Nord should play beautifully like mine did! Good luck!